The 30-Second Version
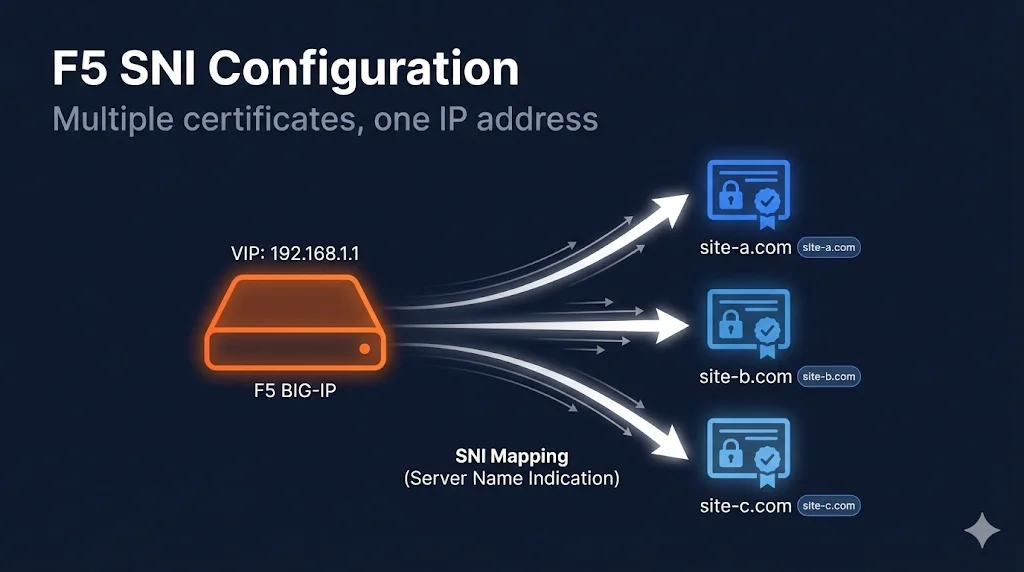
What SNI does: Lets you host multiple HTTPS sites on one IP address, each with its own certificate.
How it works: Client sends hostname during TLS handshake → F5 selects matching certificate.
Configuration: Multiple Client SSL profiles on one virtual server, each with different certificate. One profile marked as "default."
Gotcha: Older clients (IE on XP, Android 2.x) don't support SNI.
Understanding SNI
The Problem SNI Solves
Traditional SSL required one IP address per certificate. With IPv4 exhaustion, this is expensive and wasteful.
Without SNI:
192.168.1.10:443 → site-a.com
192.168.1.11:443 → site-b.com
192.168.1.12:443 → site-c.com
(3 IP addresses needed)
With SNI:
192.168.1.10:443 → site-a.com
                → site-b.com
                → site-c.com
(1 IP address serves all)
How SNI Works
┌──────────────────────────────────────────────────────────────────────┐
│                         TLS Handshake                                │
├──────────────────────────────────────────────────────────────────────┤
│                                                                      │
│  1. Client Hello                                                     │
│     ┌─────────────────────────────────────────┐                     │
│     │ "I want to connect to: site-b.com"      │ ← SNI extension     │
│     │ "I support these ciphers: ..."          │                     │
│     │ "I support TLS 1.2, 1.3"                │                     │
│     └─────────────────────────────────────────┘                     │
│                           │                                          │
│                           ▼                                          │
│  2. F5 reads SNI, selects matching profile                          │
│     ┌─────────────────────────────────────────┐                     │
│     │ SNI = "site-b.com"                      │                     │
│     │ → Use clientssl_site-b profile          │                     │
│     │ → Send site-b.com certificate           │                     │
│     └─────────────────────────────────────────┘                     │
│                           │                                          │
│                           ▼                                          │
│  3. Server Hello (with correct certificate)                         │
│                                                                      │
└──────────────────────────────────────────────────────────────────────┘
SNI Configuration Overview
What You Need
For each site on the shared IP:
- Certificate imported into F5
- Client SSL Profile with that certificate
- All profiles assigned to the same Virtual Server
- One profile marked as SNI Default (fallback)
Architecture
                    Virtual Server: 192.168.1.10:443
                    ┌─────────────────────────────────┐
                    │                                 │
                    │  Client SSL Profiles:           │
                    │  ┌─────────────────────────┐   │
                    │  │ clientssl_site-a        │   │ ← SNI: site-a.com
                    │  │ (sni-default: true)     │   │ ← Also default/fallback
                    │  └─────────────────────────┘   │
                    │  ┌─────────────────────────┐   │
                    │  │ clientssl_site-b        │   │ ← SNI: site-b.com
                    │  └─────────────────────────┘   │
                    │  ┌─────────────────────────┐   │
                    │  │ clientssl_site-c        │   │ ← SNI: site-c.com
                    │  └─────────────────────────┘   │
                    │                                 │
                    └─────────────────────────────────┘
Step-by-Step Configuration
Step 1: Import Certificates
Import each site's certificate, key, and chain.
Path: System → Certificate Management → Traffic Certificate Management → SSL Certificate List → Import
Repeat for each site:
site-a.com_2025(cert + key)site-b.com_2025(cert + key)site-c.com_2025(cert + key)- Intermediate certificates as needed
Step 2: Create Client SSL Profiles
Create a separate profile for each site.
Path: Local Traffic → Profiles → SSL → Client → Create
Profile 1 (Default/Fallback):
Name:           clientssl_site-a
Parent Profile: clientssl
Server Name:    site-a.com           ← SNI match value
SNI Default:    ✓ (checked)          ← THIS IS THE FALLBACK

Certificate Key Chain:
  Certificate: site-a.com_2025
  Key:         site-a.com_2025
  Chain:       Your_Intermediate
Profile 2:
Name:           clientssl_site-b
Parent Profile: clientssl
Server Name:    site-b.com
SNI Default:    ☐ (unchecked)

Certificate Key Chain:
  Certificate: site-b.com_2025
  Key:         site-b.com_2025
  Chain:       Your_Intermediate
Profile 3:
Name:           clientssl_site-c
Parent Profile: clientssl
Server Name:    site-c.com
SNI Default:    ☐ (unchecked)

Certificate Key Chain:
  Certificate: site-c.com_2025
  Key:         site-c.com_2025
  Chain:       Your_Intermediate
Step 3: Assign All Profiles to Virtual Server
Path: Local Traffic → Virtual Servers → [Your VS] → Edit
Under SSL Profile (Client):
- Move ALL profiles from Available to Selected:
clientssl_site-aclientssl_site-bclientssl_site-c
- Click Update
tmsh Configuration
# Create Client SSL profiles with SNI

# Profile 1 - Default
tmsh create ltm profile client-ssl clientssl_site-a \
  cert-key-chain add { site-a { \
    cert site-a.com_2025 \
    key site-a.com_2025 \
    chain Your_Intermediate \
  }} \
  server-name site-a.com \
  sni-default true

# Profile 2
tmsh create ltm profile client-ssl clientssl_site-b \
  cert-key-chain add { site-b { \
    cert site-b.com_2025 \
    key site-b.com_2025 \
    chain Your_Intermediate \
  }} \
  server-name site-b.com \
  sni-default false

# Profile 3
tmsh create ltm profile client-ssl clientssl_site-c \
  cert-key-chain add { site-c { \
    cert site-c.com_2025 \
    key site-c.com_2025 \
    chain Your_Intermediate \
  }} \
  server-name site-c.com \
  sni-default false

# Assign all profiles to virtual server
tmsh modify ltm virtual my-vs \
  profiles add { \
    clientssl_site-a { context clientside } \
    clientssl_site-b { context clientside } \
    clientssl_site-c { context clientside } \
  }

# Save configuration
tmsh save sys configVerification
Test Each Site
# Test site-a (should get site-a certificate)
echo | openssl s_client -connect YOUR-VIP:443 -servername site-a.com 2>/dev/null | \
  openssl x509 -noout -subject

# Test site-b (should get site-b certificate)
echo | openssl s_client -connect YOUR-VIP:443 -servername site-b.com 2>/dev/null | \
  openssl x509 -noout -subject

# Test site-c (should get site-c certificate)
echo | openssl s_client -connect YOUR-VIP:443 -servername site-c.com 2>/dev/null | \
  openssl x509 -noout -subject
Test Without SNI (Should Get Default)
# Connect without specifying servername (should get default/fallback cert)
echo | openssl s_client -connect YOUR-VIP:443 2>/dev/null | \
  openssl x509 -noout -subject

# Should show site-a.com (the sni-default profile)
Verify Profile Assignment
tmsh list ltm virtual my-vs profiles

# Should show all three profiles with "context clientside"
SNI with Wildcard Certificates
You can combine wildcard certificates with SNI.
Scenario: Wildcard + Specific Certs
*.example.com     → clientssl_wildcard (default)
api.example.com   → clientssl_api (specific, different cert)
www.partner.com   → clientssl_partner (different domain)
# Wildcard profile (default)
tmsh create ltm profile client-ssl clientssl_wildcard \
  cert-key-chain add { wildcard { \
    cert wildcard.example.com_2025 \
    key wildcard.example.com_2025 \
    chain Your_Intermediate \
  }} \
  server-name "*.example.com" \
  sni-default true

# Specific API profile (overrides wildcard for api.example.com)
tmsh create ltm profile client-ssl clientssl_api \
  cert-key-chain add { api { \
    cert api.example.com_2025 \
    key api.example.com_2025 \
    chain Your_Intermediate \
  }} \
  server-name api.example.com \
sni-default falseOrder of matching:
- Exact match (api.example.com) wins
- Wildcard match (*.example.com) second
- Default profile (sni-default) fallback
Common SNI Issues
Issue: Wrong Certificate Returned
Symptom: Client requests site-b.com but gets site-a.com certificate.
Diagnosis:
# Check server-name in profile
tmsh list ltm profile client-ssl clientssl_site-b server-name
Common causes:
server-namedoesn't match what client sends- Profile not assigned to virtual server
- Typo in server-name
Fix: Verify server-name matches exactly what the client sends in SNI.
Issue: All Requests Get Default Certificate
Symptom: No matter which SNI is sent, always get the default cert.
Diagnosis:
# Check all profiles are assigned
tmsh list ltm virtual my-vs profiles

# Check server-name values
tmsh list ltm profile client-ssl clientssl_site-b server-name
tmsh list ltm profile client-ssl clientssl_site-c server-name
Common causes:
- Only default profile assigned to VS
- Server-name not configured in profiles
- All profiles have sni-default true (only one should!)
Issue: Clients Without SNI Support
Symptom: Old clients/devices get wrong certificate or fail.
Reality check: These clients are rare now:
- IE on Windows XP
- Android 2.x
- Very old Java versions
- Some IoT devices
Mitigation:
- Ensure
sni-default trueis set on your most important/common site - OR: Use separate IP addresses for critical legacy support
Issue: SNI Not Working After Upgrade
Symptom: SNI worked before, broke after F5 upgrade.
Check:
- Profile inheritance (parent profile settings)
- Server-name setting preserved
- sni-default setting preserved
# Verify all settings
tmsh list ltm profile client-ssl clientssl_site-b all-properties | grep -E "(server-name|sni-default)"
SNI Best Practices
Do's ✓
- Set ONE profile as sni-default true
- Use exact server-name matches where possible
- Test each hostname after configuration
- Document which profile serves which domain
- Use consistent naming (clientssl_sitename)
Don'ts ✗
- Set multiple profiles as sni-default (unpredictable)
- Forget to configure server-name (won't match)
- Leave server-name empty in non-default profiles
- Assign profiles to wrong virtual server
Naming Convention
Recommended naming:
clientssl_[domain]_[year]

Examples:
clientssl_www.example.com_2025
clientssl_api.example.com_2025
clientssl_wildcard.example.com_2025
SNI Configuration Checklist
For EACH site:
- Certificate imported
- Key imported
- Chain imported
- Client SSL profile created
- Server-name configured (matches domain exactly)
- Certificate Key Chain configured
For ONE profile only:
- sni-default set to true (fallback profile)
For Virtual Server:
- ALL profiles assigned
- Profiles show "context clientside"
Testing:
- Each domain returns correct certificate
- No-SNI request returns default certificate
- Configuration saved
Monitoring and Maintenance
Check Which Profile is Serving Traffic
# Enable profile statistics
tmsh modify ltm profile client-ssl clientssl_site-a stats-enabled true

# View statistics
tmsh show ltm profile client-ssl clientssl_site-a
Certificate Renewal with SNI
When renewing certificates:
- Import new certificate with new name (e.g.,
site-a.com_2026) - Update the profile's Certificate Key Chain
- Test
- Delete old certificate
Important: You don't need to create new profiles - just update the certificate reference.
Frequently Asked Questions
Related Resources
F5 SSL Profiles Explained
Foundation knowledge for understanding Client SSL and Server SSL profiles.
F5 Certificate Installation
Step-by-step guide to importing certificates for SNI configuration.
F5 SSL Troubleshooting
Debug wrong certificate showing and other SNI-related issues.
F5 Certificate Chain Configuration
Ensure each SNI profile has the correct certificate chain.
How TLS Works
Understand the TLS handshake and how SNI is transmitted.
Cipher Suite Decoder
Configure compatible cipher suites for multi-domain SNI setups.